.png)
What to Expect During the Laser Grading Process: A Step-by-Step Guide
- Brannon Burks
- Sep 9, 2025
- 4 min read

Updated: Sep 10, 2025
Have you ever wondered what actually happens once you commit to laser grading your infield? What does the process look like, from the first day our crew arrives until the moment your field is ready for play again?
At Sports Field Solutions, we believe you shouldn’t just know that your infield will be leveled. You deserve to understand how it happens, what to expect during each step, and what your project will include before any work begins.
We’ll walk you through the entire laser grading process:
From the first site visit and grade check, where we measure highs, lows, and lip buildup,
To the detailed quote, which outlines work, materials, shipping, and mobilization,
Through the scarifying, blending, and grading work, that ensures a consistent 3 to 4-inch playing surface,
To the fine-tuning, rolling, watering, and compacting, that locks in stability for the season ahead.
By the end, you’ll know exactly what to expect when your field is laser graded, and why each step matters.
Site Visit and Grade Check
Once you’ve scheduled laser grading, our first step is to “shoot grades” around your infield. This means identifying high and low spots across the skinned infield, so we know exactly how much material is needed to bring the surface back to proper grade.
As a rough rule of thumb, for every 1 inch below grade, a regulation sized infield will likely require one load of infield mix (about 22 yards).
We’ll also inspect the transitions where the infield skin meets the grass. If lips have built up along the perimeter, we will want to address those during the grading process, as well. Re-establishing proper grade along the transitions not only improves the ability of water to sheet off of the infield during rain events, but it can also sometimes reduce the number of loads of infield mix required.
Preparing the Field Layout
On grading day, our crew begins by laying out the field with string lines and tape measures, confirming that baselines, arcs, and dimensions are correct. This ensures we’re working from an accurate reference before any soil or sod work begins.
If your field requires sod replacement or adjustments around the edges, we address that next. Using a sod cutter and bobcat, we remove high areas and re-establish the proper grade along the perimeter. Getting the edges right at this stage ensures a clean transition between turf and infield mix once grading is complete.
Scarifying the Infield
With the perimeter set, grading the infield begins. Our team removes bases and anchors from the skin, then scarifies the infield mix with a skid steer and tines. This loosens the existing material and prepares it to blend smoothly with any new infield mix being added.
Adding and Blending New Infield Mix
Next, the pre-delivered loads of infield mix are hauled onto the field. Using a blecavator or tiller, we blend the new material with the existing mix to a depth of about four inches.
Why four inches?
Consistent performance: A single, blended layer ensures the infield plays the same across its entire surface.
Stability: Too shallow, and the new mix can become unstable for footing.
Protection: Too deep, and you risk pulling up unwanted material like clay or rocks from the subgrade.
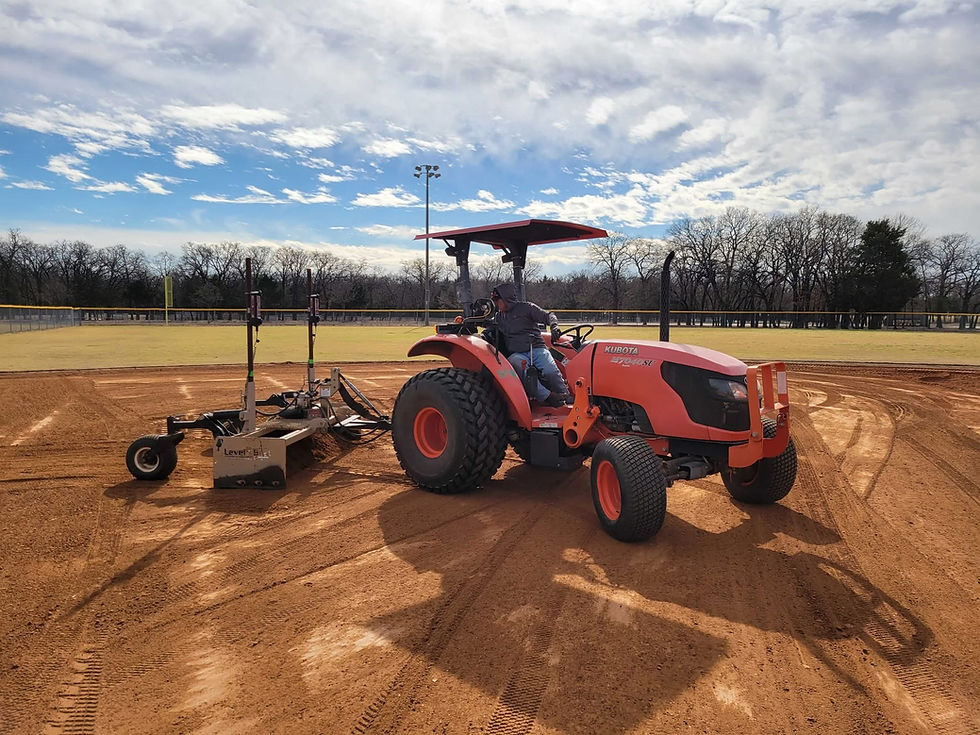
Laser Grading and Fine-Tuning
With the blend in place, we bring in the tractor and laser box blade to fine-tune the surface. Depending on how far off grade the field was to begin with, this stage can take several hours.
To finish, our staff may use an infield groomer for detail adjustments where the grading box blade can’t reach as precisely. The goal is a smooth, even surface that sheds water exactly as it should.
Rolling and Compacting
Once the grade is set, we use a large roller to compact the infield mix. Tilling and blending introduce a lot of air into the profile, and rolling helps remove those air pockets.
For best results, we recommend a combination of rolling and heavy watering. Water drives air upward and out of the mix, helping the field set more quickly. A natural rainfall can also accelerate this process, though it will leave the field temporarily soft until it dries out. Once dry, the infield will be well-set for the season.
Perimeter Sod Installation
If sod replacement and adjustments around the edges were necessary, we finish that process up after the laser grading is complete. At this stage, our crew runs string lines again for a final check of the back arc and infield dimensions, ensuring everything meets regulation before any sod goes down.
Once those lines confirm the correct layout, we re-establish clean edges and lay new sod around the perimeter. These finishing rolls not only restore proper grade transitions but also locks in the final dimensions of your infield.
Conditioner and Base Anchors
The finishing touch is to add conditioner to the infield skin. Depending on your budget, climate, and preferences, this may be a calcined clay or vitrified clay product (we’ll cover the pros and cons of each in a future article).
Finally, we reset your base anchors, so the field is ready for play.
Downtime and Ongoing Care
One of the biggest questions we hear when customers are considering laser grading an infield is: How long will our field be down?
The good news: you can usually expect your field to be playable within 1–2 days after grading. However, it’s important to understand that your maintenance staff will still need to work the infield regularly during this period. Continued grooming and watering are essential to help the new mix fully settle and perform at its best.
If you schedule the work strategically allowing some margin for weather, such as late summer before fall workouts, or during winter downtime, you can get the benefits of laser grading with minimal disruption to your season.
The Bottom Line
Laser grading isn’t just about smoothing the surface, it’s about resetting your infield to perform consistently, shed water properly, and provide safe footing for every player who steps on it.
Now that you know what to expect during the process, you can plan your grading project with confidence, knowing both the timeline and the steps that go into a top-quality infield renovation.


![7 Tips for Choosing an Infield Mix [2021]](https://static.wixstatic.com/media/93014a_26d2a3139699447c9517aabcd9bf07d8~mv2.jpg/v1/fill/w_600,h_341,al_c,q_80,enc_avif,quality_auto/93014a_26d2a3139699447c9517aabcd9bf07d8~mv2.jpg)
Comments